Applies To
- OEPE 11.1.1.7.2
- WLS 10.3.5.0
- OSB 11.1.1.6.0
Goal
เพื่อให้เข้าใจความแตกต่างของการนำไปใช้งาน และนำไปสู่ Solution ที่เหมาะสมภายใน Message Flow ของ Proxy service สามารถเรียกใช้งาน Proxy service ตัวอื่น หรือ Service อื่นได้ ด้วย Routing action, Service Callout action หรือ Publish action
- Routing Action

Routing action สร้างได้ภายใน Route Node เท่านั้นซึ่ง Route Node จะเป็นที่สิ้นสุดของ Request Processing และ Route Node ก็สามารถที่จะอยู่ภายใน Routing Table ได้เช่นกันดังรูป - Service Callout

Service Callout ใช้เป็น real-time Request-Response (Synchronous) ซึ่งจะใช้ call ไปยัง Target service ที่มี Response กลับมาด้วย - Publish Action


Publish action เป็น Request only ไม่ต้องการ Response กลับมา เป็นได้ทั้ง Sync และ Asynchronous ทั้งนี้ก็ขึ้นอยู่กับ Target service ซึ่ง
- หากเรียกจาก Business service ทำให้ Publish action สามารถกำหนด Quality of Service (QoS) เป็น "Best Effect" (default) ทำเป็นลักษณะ Asynchronous call ได้
- หรือเรียกจาก Local Proxy service (กำหนด transport protocol เป็น "local") ก็จะเป็นลักษณะของ Synchronous call
Solution
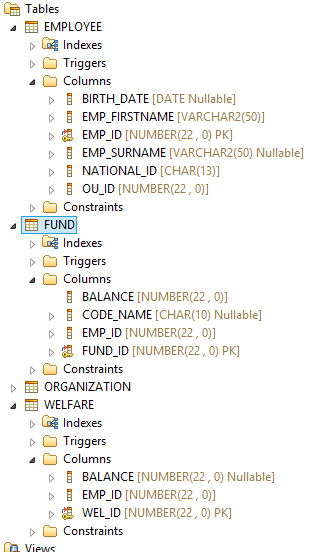
- กำหนด schema ของข้อมูลที่จะใช้ทั้ง Inbound และ Outbound service
- กำหนด scenario ที่จะนำมาสร้างเป็น Flow ของข้อมูล
- สร้าง Artifact ทั้งหมดที่จะต้องใช้ เช่น Adapter และ Transformation เป็นต้น ซึ่งก็จะได้ file ต่างๆ เช่น xsd, wsdl, xsl และ jca เป็นต้น ให้จัดเตรียมไว้เพื่อนำไปสร้าง Service ต่อไป
- สร้าง OSB project และ import artifact file ทั้งหมด เป็น resource ของ project จากนั้นนำ resource มาผูกกันเป็น Message flow ให้เกิดเป็น Service ใหม่ หรือ proxy service นั่นเอง
สร้าง XML schema
Inbound schema เป็น input ของ Service
Element name
Data type
EmpId
int
EmpFirstName
string
EmpSurName
string
OuId
int
BirthDate
date
NationalId
string
WelfareBalance
int
FundBalance
int
FundCodeName
string
สร้าง XML schema
Inbound schema เป็น input ของ Service
Element name
|
Data type
|
EmpId
|
int
|
EmpFirstName
|
string
|
EmpSurName
|
string
|
OuId
|
int
|
BirthDate
|
date
|
NationalId
|
string
|
WelfareBalance
|
int
|
FundBalance
|
int
|
FundCodeName
|
string
|
Outbound schema สำหรับ ดึงรหัสพนักงานใหม่
Element name
|
Data type
|
NEXTVAL
|
decimal
|
Outbound schema สำหรับ Insert ข้อมูลพนักงาน
Element name
|
Data type
|
empId
|
decimal
|
empFirstname
|
string
|
empSurname
|
string
|
ouId
|
decimal
|
birthDate
|
dateTime
|
nationalId
|
string
|
Outbound schema สำหรับ Insert ข้อมูลสวัสดิการบริษัท
Element name
|
Data type
|
welId
|
decimal
|
empId
|
decimal
|
balance
|
decimal
|
Outbound schema สำหรับ Insert ข้อมูลกองทุน
Element name
|
Data type
|
fundId
|
decimal
|
empId
|
decimal
|
codeName
|
string
|
balance
|
decimal
|
Data flow

Database Structure
สร้าง Artifact ด้วย JDeveloper
สร้าง Database adapter สำหรับ Outbound
1. สร้าง GetNewEmployeeIdService2 จาก Pure SQL


4. สร้าง InsertFundService จาก Operation Insert or Update (Merge) เช่นเดียวกับ InsertEmployeeService

สร้าง WSDL สำหรับ Inbound
หลังจากสร้าง XML schema สำหรับ Inbound แล้ว สามารถสร้าง WSDL จาก XML schema นั้นได้ด้วยการ Import Schema เข้า WSDL
สร้าง Messages ใน WSDL (Request & Response)

สร้าง PortType และ Binding

สร้าง Transformation


ถึงตรงนี้สร้าง OSB Project ใน Eclipse และ สร้าง folder ดังนี้

1) folder Adapter ใช้เก็บ file จาก Database Adapter

Artifact สำหรับ Business Service
2) folder Service ใช้เก็บ file WSDL ของ Inbound และ Transformation

Artifact สำหรับ Proxy Service
*** ใช้ file เฉพาะที่ Highlight ไว้เท่านั้น
สร้าง Business Service

จากนั้นเก็บไว้ที่ folder Business-Service

ให้ทำกับ jca ตัวที่เหลือ ซึ่งจะได้ดังนี้

สร้าง Proxy Service

การ configure Proxy service

Tab Transport จะ auto config ตาม ข้อมูลใน WSDL ให้ confirm ในหน้าจอ

Tab Message Handling ให้เลือก Transaction Required

Tab Message Flow
สร้าง Pipeline Pair โดย Drag and Drop จาก Design Palette ขวามือ

Add new Stage,
Service Callout action from Design Palette
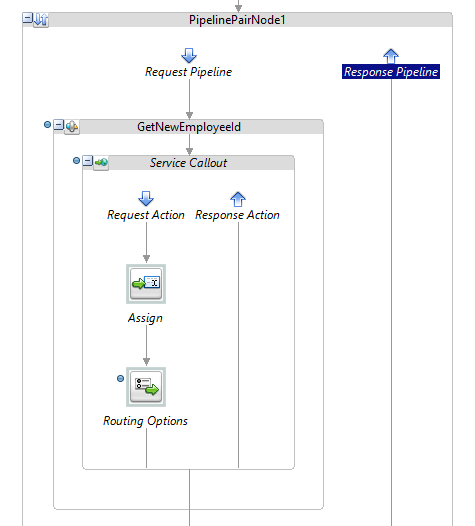
Inside Service
Callout, Add Assign and Routing Options as below


Add new Stage and add
Publish action

Inside Publish action


Add new Stage and add
Publish action

Inside Publish


Completed Message Flow

Normal Test
Request with Payload

Response

And Rollback Transaction Test

================
Good Luck.
================
No comments:
Post a Comment