- การใช้ Username Token ในการ authentication และ กำหนด authorization ของ user ที่เข้าใช้
- การใช้ X.509 Certificate Token ในการ Authentication
Username Token
กำหนด Authentication
OEPE:
เลือก oracle/wss_username_token_service_policy

ให้แน่ใจว่าเลือก Process WS-Security Header = Yes

Weblogic Console:
เพิ่ม user ที่จะใช้ในการ Authenticate เช่น mtldemo เป็นต้น

OEPE:
Publish ที่ OSB Server
SOAP UI
ทดสอบใส่ SOAP Security Header ใน SOAP Request เช่น
<soapenv:Envelope xmlns:ins="http://www.v-smart.com/TransactionalInsert/xsd/InsertXEService" xmlns:soapenv="http://schemas.xmlsoap.org/soap/envelope/">
<soapenv:Header>
<wsse:Security xmlns:wsse="http://docs.oasis-open.org/wss/2004/01/oasis-200401-wss-wssecurity-secext-1.0.xsd" xmlns:wsu="http://docs.oasis-open.org/wss/2004/01/oasis-200401-wss-wssecurity-utility-1.0.xsd"><wsse:UsernameToken wsu:Id="UsernameToken-3"><wsse:Username>mtldemo</wsse:Username><wsse:Password Type="http://docs.oasis-open.org/wss/2004/01/oasis-200401-wss-username-token-profile-1.0#PasswordText">welcome1</wsse:Password><wsse:Nonce EncodingType="http://docs.oasis-open.org/wss/2004/01/oasis-200401-wss-soap-message-security-1.0#Base64Binary">SwT0ILD0eInYfviophJvQA==</wsse:Nonce><wsu:Created>2013-07-25T06:38:34.007Z</wsu:Created></wsse:UsernameToken></wsse:Security>
</soapenv:Header>
<soapenv:Body>
<ins:InsertXERequest>
<ins:EmpId>34</ins:EmpId>
<ins:EmpFirstName>aaaa</ins:EmpFirstName>
<ins:EmpSurName>ssaaa</ins:EmpSurName>
<ins:OuId>12</ins:OuId>
<ins:BirthDate>2008-09-28</ins:BirthDate>
<ins:NationalId>1234567890123</ins:NationalId>
<ins:WelfareBalance>50000</ins:WelfareBalance>
<ins:FundBalance>400000</ins:FundBalance>
<ins:FundCodeName>savingFF</ins:FundCodeName>
</ins:InsertXERequest>
</soapenv:Body>
</soapenv:Envelope>


Add new Incoming name like x509_client


<soapenv:Body>
<ins:InsertXERequest>
<ins:EmpId>34</ins:EmpId>
<ins:EmpFirstName>aaaa</ins:EmpFirstName>
<ins:EmpSurName>ssaaa</ins:EmpSurName>
<ins:OuId>12</ins:OuId>
<ins:BirthDate>2008-09-28</ins:BirthDate>
<ins:NationalId>1234567890123</ins:NationalId>
<ins:WelfareBalance>50000</ins:WelfareBalance>
<ins:FundBalance>400000</ins:FundBalance>
<ins:FundCodeName>savingFF</ins:FundCodeName>
</ins:InsertXERequest>
</soapenv:Body>
</soapenv:Envelope>
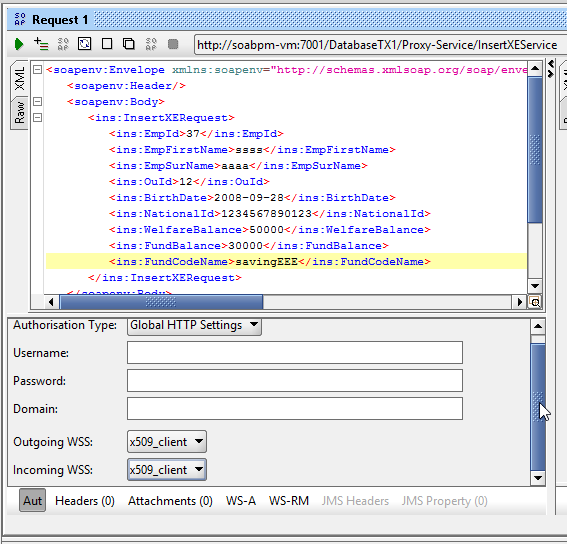
หรือทดสอบด้วยการสร้าง WS-Security ใน SOAP UI

กำหนด Outgoing WSS

กำหนด Authorization
Oracle Service Bus Console:
*** ยังไม่สามารถกำหนดผ่าน OEPE ได้
กำหนดให้ user mtldemo มีสิทธิใช้งาน Service

หากเข้าใช้ Service ด้วย user อื่นจะเกิด Fault Message


ทดสอบด้วย SOAP UI:


Add new Outgoing name like x509_client then Add Timestamp

Add Signature (ต้องใช้ Private Key)

Add Encryption
*** ยังไม่สามารถกำหนดผ่าน OEPE ได้
กำหนดให้ user mtldemo มีสิทธิใช้งาน Service


x.509 Certificate Token
สร้าง Java Key store
สามารถสร้างด้วย เครื่องมือใดๆ เช่น KeyStore Explorer (Free) from http://www.lazgosoftware.com/kse/index.html หรือ Java Key tool จาก JDK


ในตัวอย่างคือ


Apply Service Policy to proxy service
*** ไม่สามารถมี security/authentication หลายตัวได้ หากมีตัวอื่นให้เอาออกไปก่อน
จากนั้นเลือก oracle/wss10_message_protection_service_policy

- สร้าง file key store 'testkeystore.jks' และกำหนด storepass ใช้เปิดอ่าน keystore
- สร้าง certificate มี distinguished name เป็น 'cn=soabpm-vm,....' และมี alias เป็น 'signkey' และกำหนด keystore ของ certificate เป็น 'welcome1'
- กำหนดอายุ certificate 1064 วัน เป็นต้น

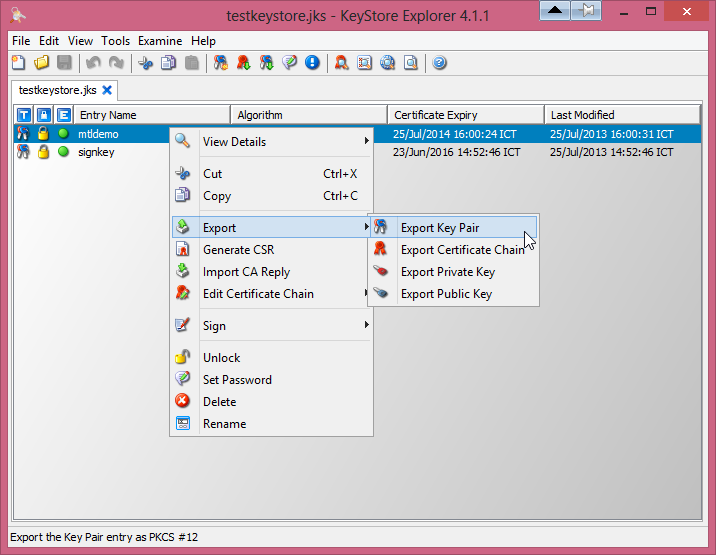
แม้ว่า Java Key store จะถูกสร้างจาก Java Key Tool แต่ก็สามารถเปิดด้วยเครื่องมืออื่นได้ เช่น KeyStore Explorer เป็น GUI ซึ่งน่าจะใช้งานได้ง่ายกว่า ในรูปจะเห็นว่ามี alias 'signkey' ปรากฎอยู่ ส่วน mtldemo คือ Certificate อีกตัวที่สร้างใหม่ด้วยเครื่องมือนี้ ดังนั้นภายใน Java Key Store นี้จะประกอบไปด้วย 2 Certificate คือ signley และ mtldemo ซึ่ง alias ตัวหลังนี้จะใช้ในขั้นตอนต่อไป
Configure OSB Server
EM:

เลือกชื่อ Domain => Security => Security Provider Configuration

- Copy file Java Key Store 'testkeystore.jks' ไปไว้ที่ DOMAIN/config/fmwconfig
- ส่วน Access Attributes ให้ระบุ Keystore Path และ Storepass ของ Keystore
- ส่วน Identity Certificates 1) Signature Key ให้ระบุ alias mtldemo และ keystore 2) Encryption Key ให้ระบุ alias mtldemo เช่นเดียวกัน ซึ่งนั่นหมายความว่าเราจะใช้ Certificate ตัวเดียวกันนี้ทั้ง Sign และ Encrypt Message เลย (จริงแล้วสามารถใช้คนละตัวได้)

เมื่อเข้าไปดูใน Credentials จะพบ auto mapping ใน oracle.wsm.security ซึ่งสามารถแก้ไขได้
ตรวจสอบ file นี้ได้
DOMAIN_HOME\config\fmwconfig\jps-config.xml:
<serviceInstance name="keystore.inst.0" provider="keystore.provider" location="./testkeystore.jks"> <property name="keystore.provider.type" value="file"/> <property name="keystore.sig.csf.key" value="sign-csf-key"/> <property name="keystore.enc.csf.key" value="enc-csf-key"/> <property name="location" value="./testkeystore.jks"/> <property name="keystore.csf.map" value="oracle.wsm.security"/> <property name="keystore.pass.csf.key" value="keystore-csf-key"/> <property name="keystore.file.path" value="./"/> <property name="keystore.type" value="JKS"/></serviceInstance>
Apply Service Policy to proxy service
OEPE:
*** ไม่สามารถมี security/authentication หลายตัวได้ หากมีตัวอื่นให้เอาออกไปก่อน
จากนั้นเลือก oracle/wss10_message_protection_service_policy

จากนั้น Deploy ที่ OSB Server
การทดสอบและการใช้งาน
ทดสอบด้วย Service Bus Console:
ในส่วน Override Value ให้ใส่ค่าของ Credential ที่ mapping ไว้กับ Certificate ก่อนหน้า
การทดสอบและการใช้งาน
ทดสอบด้วย Service Bus Console:
ในส่วน Override Value ให้ใส่ค่าของ Credential ที่ mapping ไว้กับ Certificate ก่อนหน้า

ทดสอบด้วย SOAP UI:
- สำหรับการทดสอบสามารถ Copy Key store จาก Server (testkeystore.jks) มาใช้งานได้เลย
- สำหรับการใช้งานจริงควรสร้าง Key store ใหม่เป็น Client Key Store(clientkeystore.jks)
ในตัวอย่างนี้จะสร้าง Client Key Store ขึ้นมาใหม่

เนื่องจาก Export private key ด้วยจึงมีให้ใส่ passkey เพื่อป้องกันการทำไปใช้
- ขั้นตอนแรกให้ Export private/public keypair จาก testkeytest.jks ก่อน
หมายเหตุ:
private key => ใช้ sign message
public key => ใช้ encrypt message
เลือก mtldemo และ Export Key Pair
เนื่องจาก Export private key ด้วยจึงมีให้ใส่ passkey เพื่อป้องกันการทำไปใช้

สร้าง New Java Key Store (clientkeystore.jks) และ Import keypair

ใส่ passkey จากขั้นตอน export

ปรากฏ Certificate 'mtldemo'

พร้อมนำ Key Store ไปใช้งานต่อไป
SOAP UI:
กำหนด WS-Security => เลือก clientkeystore.jks


Name
|
Namespace
|
Encode
|
Body
|
http://schemas.xmlsoap.org/soap/envelope/
|
Element
|
Timestamp
|
http://docs.oasis-open.org/wss/2004/01/oasis-200401-wss-wssecurity-utility-1.0.xsd
|
Element
|

Name
|
Namespace
|
Encode
|
Body
|
http://schemas.xmlsoap.org/soap/envelope/
|
Content
|


Test payload
ระบุ Outgoing WSS และ Incoming WSS ด้วย WS-Security ที่สร้างไว้
สังเกตุผลลัพธ์ ใน tag <wsse:Security>

;-)